Dash of Rose

A dash of rosy positivity

Wednesday, January 8, 2014

Foxy Pillow with a Bow: Sneak Peek

Hello, foxy!

I'm really excited about this bow pillow... and it is washable! So, essentially, it is a cover for a pillow.

 It is actually really easy to make though there are multiple points in the process where you can make some of your own decisions for customization and such.

This pillow really taps into my love of wild animals.  Foxes are one of my favorites! They're beautiful and elusive.  I don't see them very often, and when I do, it's usually a quick flash of red that catches my eye first.

Anyway, this is just a sneak peek because a tutorial will be on its way (I'm shooting for the next couple of days)... so check back! Or you can simply follow me (such as on my profile on bloglovin' so you'll know as soon as it's out).

Have a good night, everybody! 


Read More

Tuesday, January 7, 2014

Planning is like wonderful dream: Home Office


Fabric-Covered Corkboards//
Desk with glass covering collage on desk-top

I'm truly blessed that I really enjoy my job.  Even on days like today... one of those... no time find lunch kind of days.  Thankfully I have "emergency" instant oatmeal at my desk that I gobbled up and then jogged from the break room to my desk to hop on a meeting...where I was presenting...that ended up not going nearly as well as I'd like.  Thank goodness that as soon as that meeting was over I had to head over to my final Dale Carnegie class session.  It was like jumping back into the positive world.  That class has also been wonderful.  It has taught me so many important interpersonal human relations principles and has taught me how to not be stressed.  This course has brought such enthusiasm to my life... time, and time again I experience the benefits first hand in my life and on the job.  Highly recommended to everybody! Sometimes they offer free sample workshops/sessions at various locations and I believe they have some online resources.  Great for personal and professional development.

A few select principles were really important for the meeting (that took over my lunch) I had today:
  • Don't criticize, condemn, or complain
  • Give honest, sincere appreciation
  • Show respect for other person's opinions. Never say, "You're wrong."
  • Try honestly to see things from the other persons point of view
I want a space that will be a natural extension of this enthusiasm and hopefully that enthusiasm I feel being in this (future) office space will just encourage me to transfer that to my work! I want a space that will encourage me to be creative in my everyday life, in whatever I do.

Bonus:


This is just a start towards the design process and of course, things can change, I may  change the styles. But I do like designs that are flexible to  style change, that can mix and match with others easily, and serve multiple purposes.

I definitely need to pick some crafty supplies up the next time I'm at the antique mall and various stores.

I am so excited about designing my future space and am looking forward to crafting things to add my own style to my space...I've got so many projects swirling around in my head!

Stay tuned for more plans, fabric I am excited about, and projects in progress/completed!

In order to carry a positive action we must develop here a positive vision -- Dalai Lama
Read More

Monday, January 6, 2014

Some of the best projects are the simplest. Bonus: Cute Hedgehog

Sneak Peek: Hedgehog Pincushion! Read on!

Simplicity can bring such satisfaction and joy.


So I have this boomerang pillow from SleepNumber that is super comfortable, but the case that it came with isn't very soft.  It's smooth, but not huggably soft.
First, I washed and dried the fabric to decrease likelihood of shape warping when I wash it later.  Then, everything else was nearly as simple!  I ironed the flannel and then folded it in half (it's approx. 2 yards worth) then outlined the laid-flat pillow cover... then sewed up the sides, leaving one of the sides open.  Then hemmed the open end and voilà, simple pillow case cover that is perfect for these cold winter days!


This boomerang pillow case is a total win because of the amount of "Usefulness" it provides, relative to the amount of inputs (complexity/time/money) that went into it.  "Usefulness" totally outweighed the effort I put into it. To me, the simplicity is beautiful and it makes me happy, even though it isn't much of a looker by modern standards.  Sometimes, I think that's a problem in my life.  Sometimes expectations about what something should look like, be like, sound like, feel like, etc. just blinds me and prevents me from living in the present and appreciating all the little details in my life that make my life all the more meaningful.  I really enjoyed making this boomerang pillow cover and I feel a lot of satisfaction because it was so easy and will provide me many cozy nights of sleep (zzZZzzz).

Now... the Adorable Hedgehog!
Original/Inspiration Hedgehog Pincushion Tutorial.
The tutorial from the site comes with a really nice pre-prepared printable drawing to use as guides to cut the fabric! (Materials used for the hedgehog, minus the stuffing)


When the tutorial calls for some of the pieces (head, ear, and body template) to be cut two times, but in mirrored form... this is what she means.


Note that when cutting the faux fur (if you choose to use faux fur) that the hair should be headed towards the back of the body.


I personally enjoyed lint-rolling periodically.  This is partly because I was a little concerned that the hand vacuum would just blow the tiny pieces of faux fur all over the places...didn't exactly want to cough up faux fur.


So, at some point, the tutorial says to pinch and sew the ears.  To make it easier, I sewed a tiny "dot" in the middle of the ear so that when it's pinched together, the middle doesn't bulge out, and to ensure that when sewing the ear that the needle goes through all the layers it needs to go through.

When sewing the ears on, don't sew the entire ear to the body, just the bottom.


Progress!

Sewing the head to the body, the right side of fabric (the side of the fabric you see) touches the right side of the other fabric.  Then sew together.


Each side of the head is sewn on to its matching side of the body!


The furry side of the two body pieces will be touch.
Sew the two pieces together, but make sure you leave the back open... 
The rest of the tutorial is pretty straight forward!


This hedgehog pincushion is such a joy to make.  It definitely has a strong cuteness factor.  Even if this hedgehog was really complicated to make... it'd be worth it.

There are many wild animals that I am completely overcome with excitement about when I see them, I just think they're amazing creatures.  
For the pygmy hedgehog, this is where it all started, the youtube video titled Boogie Boogie Hedgehog.
Then there's Biddy the Hedgehog on Instagram.
Now I have a cute little hedgehog pincushion!

In the future, projects incorporating other cute wild animals will created!

What are some simple DIY projects that bring you joy?
What are some projects that are totally worth the effort?




Read More

Follow me on BlogLovin'!

Bloglovin' is this awesome "one stop shop" site and has an application that you can use to keep up with blogs that interest you, find blogs by themes, and it will let you know when the blogs you follow have new posts!  It's so intuitive and easy... and they even have options/application that you can use to put it at the top of your browser!

Lovin' Bloglovin'

Follow my blog with Bloglovin'


Read More

Saturday, January 4, 2014

Neck Pillow Cover Sewlution and Infinity and Beyond Scarf Attempt 1


Brr...Apparently we're in for quite a cold spell.  Monday is supposed to reach -4F... in Louisville, KY, that is pretty unusual... So... that explains why as I was doing errands that the grocery store was packed as if it was the super bowl... and explains the lines at the gas station... Everybody was stocking up!  I had to buy groceries anyway so I did make some effort by buying more non perishables such as granola bars.  It's only supposed to be super cold for late Sunday and all of Monday so I'm hoping nothing really goes wrong.  Everybody at the complex received a note recently telling us to take precautions to ensure that our pipes don't freeze and burst. I'm just hoping the cold doesn't do major damage because this place simply isn't used to these kind of conditions.  I mean, I'm convinced the walls are not insulated well because last year Josh and I weathered the windows and it didn't do any good.  It was still really cold by the walls.  On the bright side, I have sufficient food for a week and Josh left one of his super warm sleeping bags here so at least I won't freeze if the electricity goes out.  It will be okay regardless!

Anyway, I digress...

So remember that problem from the previous post about the neck pillow? Well, after a few ideas thrown around I decided this would be the most straight forward and quick.  I played around with the idea of ruched via elastic patch that could stretch back and forth... but that just seemed too tedious and I am not really in the mood for anything particularly challenging today.

The top photo is where I cut the seams where it was already torn to expand the hole.  The bottom is where I essentially just added a patch in the shape of the hole you see in the top photo.  I'm really hoping this doesn't tear again.  If it does, I'll go ahead with that ruched idea probably but starting from scratch.  Sometimes that's just the best thing to do, as opposed to patching up problems.
Proposed plan, drafted from my iPhone (ha ha...)
First, pretend that one of the sides of the ROUNDED (pretend it's rounded...)rectangles is actually made up of two skinny rounded rectangles that have an embedded zipper holding them together, just like the original tutorial used from that previous post. The wrong sides of fabric face out and the right sides are touching each other.
1. Leaving the zipper mostly unzipped... (So you can turn it right side out) sew around the sides
2. Take elastic and sew ruching on both of the long sides in the middle along the edge, this is where they would forcibly curve in and stretch out by the pilllow and whatever the pillow is placed around (like your neck...). Probably good to make sure that the elastic used for ruching isn't toooo strong or else it won't bend with the pillow very well... And don't stretch elastic too far out for super tight ruching for the same reason.
3. Turn right side out and sew up the side that was left open.
(Note, have yet to test this out, but this is one of the ideas I was playing around with in my head)
An example of how to do this sort of elastic ruching from craftsy.http://bit.ly/1i94psF


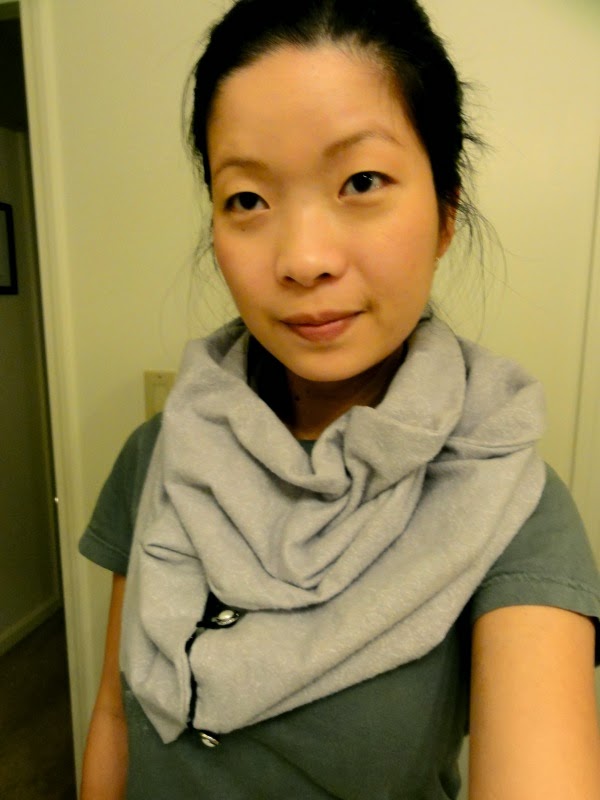
Then I decided to make an infinity scarf.  Not just any infinity scarf... but infinity and beyond (tutorial I found, here).  I really like the tutorial because it is very simple and the photos are great.
These are not the original buttons I intended for this project, but I had accidentally purchased other buttons that were not raised, which would have made it difficult to button the two sides of the scarf together. The ones I ended up using were originally intended for the future office chair slip cover. We'll see what happens with that sometime in the future I guess.


The finished product.


Take 1.


Take 2.

Okay, that's all for today.  Time for some hot chocolate! Bring on the blistering cold, I gots my wool blankets and beverages!


Stay warm, everybody!
Read More

Introducing my JUKI and SEWlutions sneak peek

So I'm really excited about my sewing machine!  I'm not an experienced sewer but I'm learning plenty and have a ton of sewing projects that I want to make (Examples are on my Pinterest).

Let's dive right in!

Introducing my new JUKI HZL-K85:
I was worried that the pedal and power cord would accidentally hit the sewing needle and damage the machine in general, so one of the first things I made is a very simple bag with an elastic opening, strap that wraps around the machine then fastens with a little snap button.  It was sewn with haste so it isn't very neat, but it gets the job done! I feel much more at ease about the safety of my machine.  One of my favorite features about the sewing machine is pictured middle left.  Notice the tortoise and the hare.  That lever is so intuitive and illustrates the maximum speed you can go with the pedal when you have pre-determined the setting!

Sew Organized:

Pictured in the collage above are the various ways I've organized my little sewing area.  I don't have a whole lot of things for sewing, but it's a start and it's definitely the basics!
Storage: Snapware Snap 'n Stack Craft Organizer-Small Square / Sewing Caddy Tutorial
Lessons: Don't use pins if it is way too many layers of fabric because sewing through the layers will end up crooked... the result? crooked pocket seen on the right hand side of that sewing caddy. Sigh. SEWlution? Binder Clips or Clover Wonder Clips.

SEWlution/Problem/SEWlution:
So, I have this memory foam neck pillow that I use when I'm driving in the car for many hours.  Well, I wanted to make a cover for it with some soft flannel.  I found a neck pillow zipped cover tutorial... it turned out well and I was thrilled... until I realized that it is really not very flexible at all...and was tight around my neck...and when I wanted to set it on the back of the passenger seat I stretched it out so far that the seams ripped... whoops! Sigh. ☹ ☹ 
Stay tuned for the SEWlution for the ripped seam problem for the neck pillow!

Problem & SEWlution:

So, I have this awesome juicer.  It is actually very awesome... problem is, I don't use it very often anymore, especially since it's actually pretty expensive to get all the ingredients for it to make a decent amount of juice.  I don't really want to put it away in the box because then I really won't use it and it'll have become a complete waste of money.  But, the problem is that it was collecting dust on my counter... SEWlution? simple cover.

Problem & SEWlution:

So... I wanted a bag to be able to hold my various on-the-go stuff emergency kit so it contains things like... blotting paper, band-aids, lip balm, hand lotion, kleenex, phone charger... stuff like that for when I'm out of town or out and about for extensive periods of time.
Learning from my mistakes: I really DON'T recommend using non fusible vinyl for the lining of stuff... It's annoying to work with for a beginner, and once the needle goes into the vinyl and makes a hole, there's no turning back so you pretty much cannot screw up and save yourself without starting over with the lining.  SEWlution?: Iron on Vinyl (you can get it in a gloss finish or matte finish... i prefer matte finish)


Problem:
Pictured here is my desk chair at home.  Actually, I haven't even used it in months and months... I just dragged it out of the back of the garage today, cleaned it up, and it's now hanging out in my apartment waiting to be clothed.  I really want to make a nice slipcover for this chair to really bring my desk together, and be very flexible with the changing décor around it.  That, and I'm excited to work on this for my future home office once I relocate summer 2014!  Funny, I was telling my manager about this upcoming project and she was like, "So is this for your home now or your future home?"  She knows me too well.  She also pointed out that my sewing projects are generally very practical.  I don't sew just because I see a nice pattern, but I'm often very "inventive" and try to find solutions to problems (They're not really problems, but they're certainly opportunities I want to take advantage of).  

I have a whole list of problems I want to solve... such as coming up with something for my glovebox.  I drive a a teeny vintage green FIAT 500 Sport 2012 and the glovebox is a disaster (it's slanted weird and every time I open it, everything either falls out or is very likely to).  Then again, there is very little in terms of storage space in my car, simply because it is very small/compact.
Introducing to you: my Baby Fiat

Be prepared to see a lot of SEWlutions in the future...

Read More

Wednesday, January 1, 2014

Dawn of 2014

I always feel like it is so cliché to reflect on the past as being full of ups and downs because that's simply a part of everyday life.  Without the downs, one would not know and appreciate the ups and they make those good times all the better.  All the downs are an opportunity for good and if nothing else, a good learning experience and practice for potentially harder times to come.

2013 has taught me a lot though, that I have some amazing people in my life, that stress is not only unhealthy but not productive.  There is no reason to worry about something that hasn't even happened yet and it's likely the anticipated problem won't happen anyway.  There is also a required balance that the stress level should not exceed the worthiness of the problem.  That energy spent on worrying can be much better spent on other things, whether that be a walk, good company, a hobby, self-reflection, and personal as well as professional growth.

2013 has shown me a glimpse of how I am able to push beyond my comfort zone and really grow.

2014 is fresh, full of opportunity, and blank pages. I have a lot of hope for 2014 and plenty to look forward to.

The Good:
  • Beautiful weather this January 1, 2014
  • Woke up thinking about cute animals and sewing projects
  • Beginning the year with a wonderful new sewing machine (JUKI HZL-K85), gifted to me for Christmas 2013 by my very thoughtful boyfriend.  He did good!  I'm an amateur when it comes to sewing machines but even I know that this is a great machine and certainly the nicest I have ever operated myself!  It's computerized, has so many patterns and capabilities, has a nice light that shines where I sew, and even has a red/green light akin to a traffic light that lets me know when something is amiss and that I should "stop" sewing. #sewhappy .  I was down a lot in 2013 and he's had to be patient and put up with me.  He has been so supportive though and this is a wonderful gift that will keep on giving. #thrilled


  • I have a long list of sewing projects to come!


  • I will be relocating closer to my boyfriend and our families to telecommute for work starting this summer.  Finding a home during that specific time-frame to rent will be difficult, but it will be a challenge... and... "It's a good problem to have."
  • Health is in my favor
  • My job is wonderful
  • There are so many lessons from 2013 that will serve me well for 2014, and there are plans for personal development to be a better person, to put everything in a positive perspective, to not have pity parties, and to live.

Cheers to 2014 and may you have a happy, healthy, and bold year!


Read More

© 2011 Dash of Rose, AllRightsReserved.

Designed by ScreenWritersArena

09 10